Documents
From Upload to Mark-Ups get your current documents shared right.
Written By Patrick
Last updated 5 days ago
Mercury uses the Current Set folder as the location to keep the version everyone should reference. No need for file or folder names with version numbers, dates or mystic codes like “final” in them.
Desktop Document Navigation
Navigation tools are in the upper left.
Pan (hand) - Click to drag the page in any direction.
Manual Zoom - Increase or Decrease the Zoom
Zoom / Scroll - Toggle between scrolling (multiple pages) and zooming with the roller/two fingers. Ctrl +Zoom Not Required.
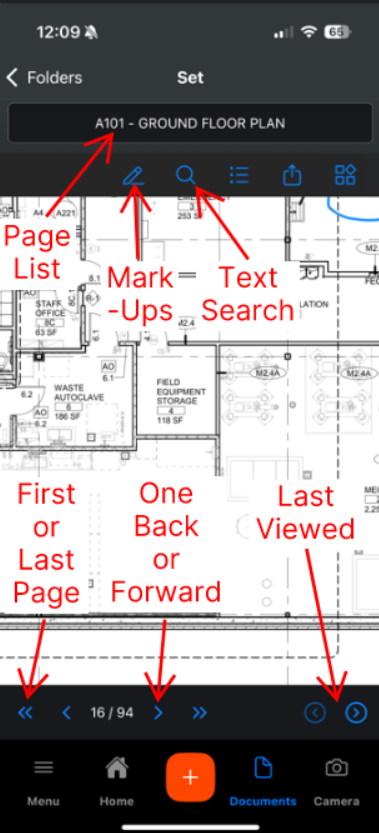
Mobile Document Navigation
Traveling through a drawing or spec set is handled with the drawing list at the top of the screen and the arrows at the bottom. Search the list from the top or jump one page or retrace your stops with the View Last arrows.
Mark Ups
No need to define each tool here, but keep in mind mark-ups will be seen by all when made on the Public and Current Set and can be done on any document (including specs). Mark-ups will copy forward when pages are replaced.
**Pin or link to Forms (like RFIs) to drawings
Cloud area’s in any shape
Add shapes from circles to arrows
Highlight text or Freeform
Measure or Simple Take Off
Downloading page can be done in this same tool bar too.

** Check this article on how to Customize Pin Labels.
Document Search
Use the search bar in the upper right to search text in any document. The search will show how accurate the match is, what page/sheet it’s on, and then highlight it on the page.

View by Update
If an update was made to the documents that replaced pages and you want to view only those pages, use the “view by update” option. A use case would be only looking at the drawing sheets issued with a specific ASI. A Current Set option is available in every document and it represents the latest (most current) version of every page. Anyone with VIEW permissions can utilize this feature. To reset the filter select the X in the gold banner or leave documents.

From the Drawing search tap Updates

Then choose which update to filter by

Document Upload
Mercury will take a multi-page pdf and break it out to view individual pages matching the bookmarks included in that PDF. Here’s a visual aid of Mercury next to a bookmarked PDF from this article. If you don’t have bookmarks scroll to the bottom of this article for how create them automatically with Blue Beam. For specs, only the first page of the section needs a bookmark.
Verify Bookmarks and Page Labels are included and titled correctly
Break down the drawing set into files by discipline (Architectural, Structural, Civil, etc).
From Current set hit the + and then name the set (folder).
Open the folder and select + Document
Choose the Document type
Select upload and choose the file. Repeat this step for each set.
SPECIFCIATION ONLY: Prior to viewing any pages, verifying the title and page range by selecting the three dots next to the title, select edit and then the Update Range flag.
Document Upload [BETA]
Admin Permissions required.
We receive PDFs with all sorts of Bookmarks and Labels configurations. We’ve attempted to accommodate all those variables so that once loading into Mercury, page labels will be clear without spending time in a PDF editor first. Hit the Contact Support button if you’d like to be part of piloting this feature.
From a Documents folder, select +Add Document from the bottom left

Choose Drawing, Specification or Document

Fill out Name, Date, and Description in the upper right.

Mapping Configuration [these are the labels that will show in Mercury]. The Sources section will display if your file had labels or bookmarks or like the example below… neither.

Choose the Source. Use the “missing” message to make sure all pages have a label.
PDF Label or Bookmarks [the pages already have labels in the left panel] - If the PDF file contained either of these, use this method. Use the Title Template to modify the formatting of those labels.
Text Regions [It just says Page 1,2,3 in the left panel]- If the PDF wasn’t created with bookmarks or labels use this method.
Select Regions - Select the first region and then use Add Region for additional. The Assembly Template field will allow the formatting.
Page Range - This is used in the case not every page has an identical layout it’s possible to have a specific range have a different region. Ex - The architectural title block does not match structural, so the page ranges would match the dripline so that the Text Regions could be

Press Continue.
Update Individual Pages
Admin Permissions required.
Updating documents is critical, so here is how to replace pages one at a time.
Select the sheet in need of replacement
Select the three dots and next to the page name and click New Version

Verify Page Name, and Enter Revision information. Revision Name will appear next to the V1, V2, V3 like the example below that shows ASI002.
*Revision information provides accurate document log exports.


Bulk Update Documents
If you have multiple pages to be replaced (like an ASI) use the bulk update option to avoid individually replacing each sheet. *PDF BOOKMARKS ARE STILL REQUIRED.
Select the 3 dots next to the Section Name at the top of the page list.
Choose Bulk Update

Enter Revision information and then Choose File

Resolve Any Conflicts and then Review Mappings
If there are bookmarks that don’t align well enough you’ll receive the prompt below.
-Create New Page: The page doesn’t replace an old one.
-Map To Existing: Select the page that needs to be replaced (the bookmarks didn’t match).
-Skip Bookmark: No new page needed.
Review Mappings
This is the double check that the new pages were named replaced correctly.

Bulk Update Documents [BETA]
We’ve redesigned the bulk update process to create a simpler and faster process. Hit the Contact Support button in the app to get the try beta.
Select the 3 dots next to the Section Name at the top of the page list and choose Bulk Update.
Verify Page Labels and Select Continue (see Document Upload Above)
Review auto matching by choosing one of the three options below for any of the pages but start with the Needs Attention (if applicable).
Match aligns the new page with existing. Choosing match will bring up a list of existing sheets to pick from and a preview of both the Uploaded (new) page and the Target (existing).
New Adds the page to the set (nothing matches)
Skip will remove the sheet

Once all sheets are resolved Apply Changes.

Document Notifications
After Bulk Updating or Adding Documents, the prompt below will give you the option to choose groups or user from the projects directory and add a short message to include in the body of the email.

A log of document notifications is kept and can be viewed or searched by selecting Notification History at the bottom of the Document home screen.


Document Distribution
You can send a link to document folders or files via email.
From the 3 dots (options) choose Distribute Folder.

Choose from the Project Directory Groups and Users.

Edit Version Information
The version number, date, title and description can all be edited in case it was uploaded incorrectly or missed.
Select the three dots next to the page name and select Edit Version.
Change the Name, Description or Upload Date.
Recycling specific Versions happens here with the Trash Can.
REORDER versions by dragging the waffle on the left corner.


Export Drawing or Spec Log
Need a list of drawings or specs in a CSV (Microsoft Excel without formatting) file?
Select the three dots next to the Section Name and choose Export Log (CSV).

Choose Export CSV

Open your downloads folder to find a CSV file like this one.

*Make sure your Version information is accurate on each page!
Drawing and Specification Export
Use these features if a PDF copy is needed for record or just to be used outside of Mercury.
Select the three dots next to the Section Name and choose Export Document.

Choose which pages or select all and then Export.

A new tab will open with a single PDF with Mark-ups. Pop-up blockers could stop the new tab from opening so use the “Click here if the download…” in the message.

Good to Know
When pages are replaced any existing markups will transfer forward to the new version (and stay on the old one).
Selecting the Document name in the far upper left will open a search box for page titles of that document.
The Private folder can only be viewed by you, but Public can be seen by all users with access to the Documents.
Archive removes the document from the project, but just let us know if realize you need it someday.
PDF didn’t come with bookmarks and Page Labels? Bluebeam has multiple features to create or modify them. If the bookmarks panel is empty, see if the page labels show where the page numbers are located in the bottom center. If so, inserting bookmarks is easy. Here’s a link Bluebeam Technical Support - Bookmarks or if you don’t even have that watch the video below. Once you have Page Labels or Bookmarks, adding the other is simple.